A tree in computer science is a data structure that has a wide use in the field of computer science, it has a root, a sub-tree of children with a parent node, represented as a set of linked nodes. This data structure has extensive use cases, trees are the basis of other data structures such as Maps and Sets, in addition to a clear example of the use of trees are fast searches in databases and representing the HTML DOM hierarchy. There are different types of trees, however in this post we will implement and graph a binary tree using Canvas and JavaScript.
What is a binary tree?
A binary tree is a data structure, it begins with a top node called root and branches with its descendants (sub-trees) until it finally ends at nodes called leaves. Each node can have a maximum of 2 children, left and right. In case that node does not have any reference, it means it does not have children, it is called leaves or external node.
Implementing the binary tree data structure
In the previous blog you realized that a binary tree is a data structure, where each node has a value and pointers (links) to 2 children or descendants, below is the implementation of a node.
Note: It is assumed that the reader has knowledge of the tree data structure, so the explanation of its implementation will not be deepened.
const LEFT = 0
const RIGHT = 1

class Node {
    constructor(value) {
        this.value = value
        this.children = []
        this.parent = null
        this.pos = { x: 0 , y: 0}
        this.r = 20
    }

    get left() { return this.children[LEFT] }

    set left(value) {
        value.parent = this
        this.children[LEFT] = value
    }

    get right() { return this.children[RIGHT]}

    set right(value) {
        value.parent = this
        this.children[RIGHT] = value
    }

    set position(position){ this.pos = position }

    get position(){ return this.pos }

    get radius() { return this.r }
}
Well, now that we have the node class, we are going to implement the Tree class, which allows inserting the child nodes, their value and position.
class Tree{

    constructor(){
        this.root = null
        this.startPosition = {x: 800, y: 44}
        this.axisX = 350
        this.axisY = 80
    }

    getPosition({x , y}, isLeft = false){
        return { x: isLeft ? x - this.axisX + y : x + this.axisX - y, y: y + this.axisY }
    }

    add(value){
        const newNode = new Node(value)
        if(this.root == null){
            newNode.position = this.startPosition
            this.root = newNode
        } else {
            let node = this.root
                while(node){
                    if(node.value == value)
                        break
                    if(value > node.value){
                        if(node.right == null){
                            newNode.position = this.getPosition(node.position) //get current position of new node
                            node.right = newNode
                            break
                         }
                         node = node.right
                     } else {
                         if(node.left == null){
                             newNode.position = this.getPosition(node.position,true) //get current position of new node
                             node.left = newNode
                             break
                         }
                         node = node.left
                     }
               }
        }
    }

    // bfs(){ ... } it will be implemented later
}
In the Tree class, 4 attributes are initialized in the constructor, which are:
- root attribute refers to the root node of the tree.
- startPosition is an attribute used to determine the position on the abscissa axis or X axis and its ordinate or Y axis, of the root node.
- axisX and axisY, are numerical constants that allow the nodes to be moved graphically in the plane.
- The add method of the Tree class allows inserting a new node in the tree, the position of the node is changed depending on whether it is a left or right node.
- getPosition method receives the X and Y position as an argument, isLeft flag by default is false, this method allows to calculate the new position in plane of the new node. The constant axisX is added or subtracted from the X axis together with the position in Y, since in this axis less and less distance will move between nodes, while the depth of the tree is greater. On the other hand, the Y axis only adds the constant axisY, because the distance between the nodes on this axis will always be the same.
Breadth First Search
To graph the binary tree in the plane, it is necessary to go through each node of the tree, for this there are 2 possibilities:
- The first is the Depth First Search - DFS, which starts from the root and expands each of the nodes to the end nodes or leaves, for each of the branches, using a stack to temporarily store the nodes while traveling .
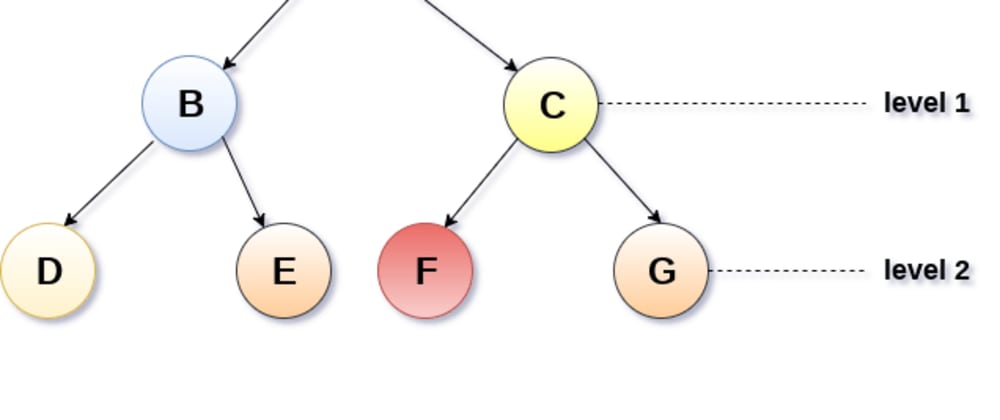
- The second option is the Breadth First Search - BFS, which starts from the root and traverses each node through levels instead of branches, using a queue to temporarily store nodes.
To graph the tree, I have decided to use the BFS since I prefer to graph the nodes by levels, it is true that when it is required to visit all the nodes of the tree it is better to use DFS since the search by width is efficient in finding the shortest path, however in this case tastes and preferences are far from being technical.
It is time to graph the tree by implementing BFS
var c = document.getElementById("myCanvas")
var ctx = c.getContext("2d")
...
bfs() {
    const queue = []
    const black = "#000"
    queue.push(this.root)

    while (queue.length !== 0) {
        const node = queue.shift()
        const {x, y} = node.position
        const color = "#" + ( (1<<24) * Math.random() | 0 ).toString(16)

        ctx.beginPath()
        ctx.strokeStyle = black
        ctx.fillStyle = color
        ctx.fill()
        ctx.stroke()
        ctx.strokeStyle = black
        ctx.strokeText(node.value, x, y)

        node.children.forEach(child => {
            const {x: x1, y: y1} = child.position
            ctx.beginPath();
            ctx.moveTo(x, y + child.radius)
            ctx.lineTo(x1, y1 - child.radius)
            ctx.stroke()
            queue.push(child)
        });
    }
}
The above algorithm is detailed below:
- Create a queue variable, in javascript an array serves this purpose, const queue = [].
- Insert root of the tree, queue.push(this.root), into the queue.
- As long as the queue has nodes, the following is done.
- Remove the first item from the queue and return the item removed const node = queue.shift().
- Get the position of the deleted node const {x, y} = node.position, also the following line, calculates a color randomly.
- Start a new route by emptying the list of sub-routes, since it is required to create a new route to plot the circumference, ctx.beginPath().
- Determine the color of the line, a black color in this case, ctx.strokeStyle = black, and also determine the fill color, ctx.fillStyle = color.
- Draw a circle, you have to draw an arc of 360 degrees, that is, 2π radians, for this we use the method ctx.arc(x, y, node.radius, 0, 2 * Math.PI), where X and Y is the center of the circumference, the next parameter is the radius, the 0 represents the starting angle and the last represents the final angle in radians.
- Draw the previously defined line ctx.stroke(), and assign the black line again, ctx.strokeStyle = black.
- Write the value of the node ctx.strokeText(node.value, x, y), in the same position on the circumference.
- For each child node that the parent node has (node.children.forEach) the following is done:
- Gets the position of the child node const {x: x1, y: y1} = child.position.
- Draw a line from the parent node (ctx.moveTo (x, y + child.radius)), to the child node (ctx.lineTo (x1, y1 - child.radius)) joining the edges of each circumference.
- Add the child node to the queue.push(child).
Ready!. The method to graph the tree is implemented, it is time to put into operation the insert and graph methods of the tree class.
const t = new Tree()
t.add(10)
t.add(5)
t.add(15)
t.add(3)
t.add(14)
t.add(16)
t.add(4)
t.add(6)
t.add(2)
t.bfs()
The result of the execution of the previous code will be the following.

This source code can be found on GitHub.
Was it useful? Show your support or share it!
Thank you!!